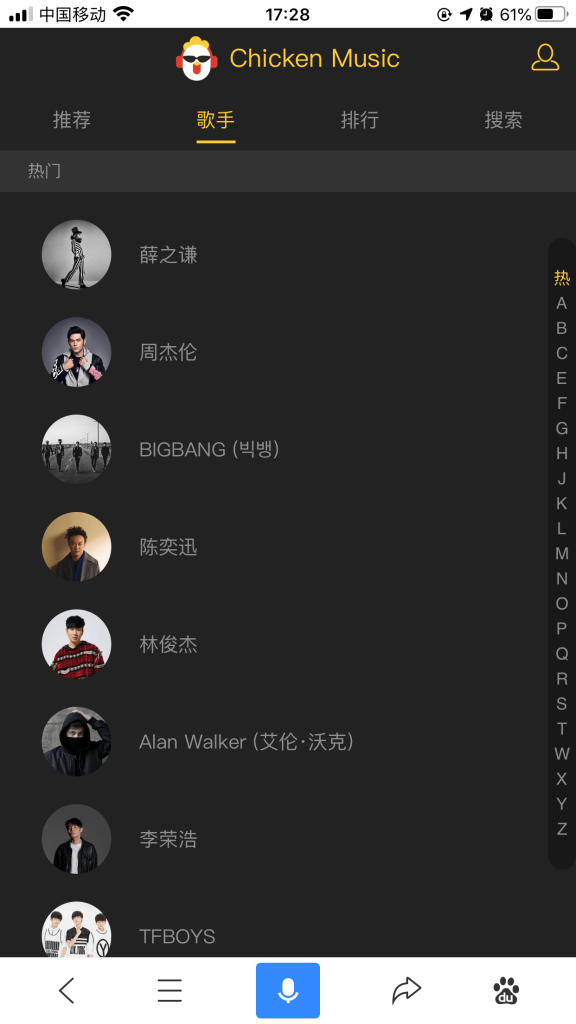
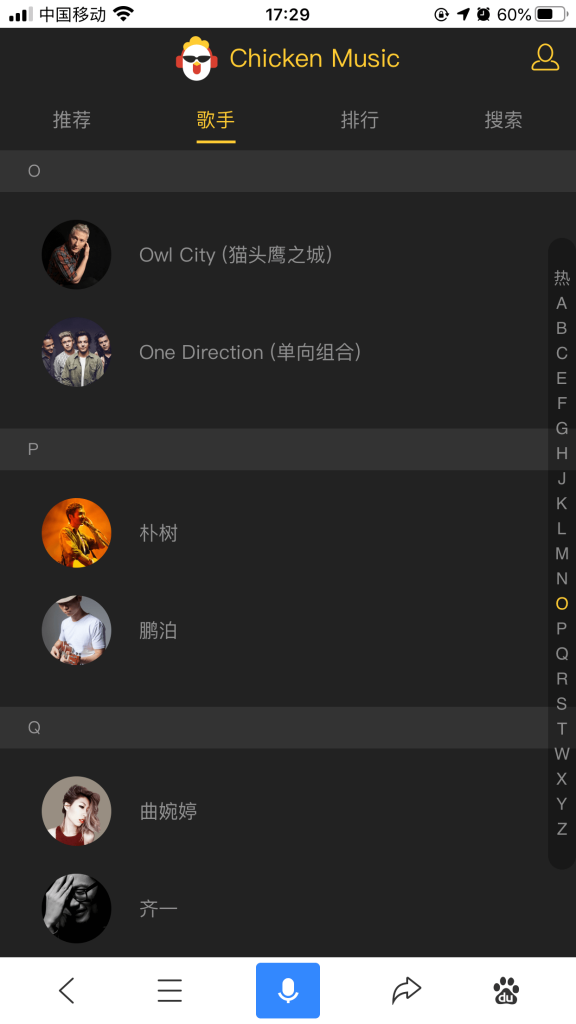
何为listview?简单来说就是类似于我们手机自带的通讯录列表、音乐APP的歌手列表、外卖APP的分类菜单……,本文介绍的listview组件具备以下特性:
- 列表数据按照一定的分组依据(如热门、A、B、C等)进行分组后有序排列;
- 每组数据的顶部都有以该组名称命名的头部标签,用户滑动列表,相邻的两个头部标签之间会产生替换动画;
- 右侧提供快速定位的导航条,类似锚点,除简单的点击触发以外,还支持手指滑动,十分接近原生体验。


该组件实现难度较大,文章篇幅也较长,但是其中也包含了众多精彩的前端技能,所以还是希望大家能花点时间阅读本文并加以实践。
一、处理数据
数据通过jsonp跨域调用QQ音乐真实线上接口获取( 该部分不是本文重点,所以省略 ),获取到的数据是扁平的:
list: [
  {
    Farea: '1',
    Fattribute_3: '3',
    Fattribute_4: '0',
    Fgenre: '0',
    Findex: 'X',
    Fother_name: 'Joker',
    Fsinger_id: '5062',
    Fsinger_mid: '002J4UUk29y8BY',
    Fsinger_name: '薛之谦',
    Fsinger_tag: '541,555',
    Fsort: '1',
    Ftrend: '0',
    Ftype: '0',
    voc: '0'
  },
  {
    Farea: '0',
    Fattribute_3: '2',
    Fattribute_4: '0',
    Fgenre: '0',
    Findex: 'Z',
    Fother_name: 'Jay Chou',
    Fsinger_id: '4558',
    Fsinger_mid: '0025NhlN2yWrP4',
    Fsinger_name: '周杰伦',
    Fsinger_tag: '541,555',
    Fsort: '2',
    Ftrend: '0',
    Ftype: '0',
    voc: '0'
  },
  // 省略后面98个
]
这种数据不能直接使用,需要处理成如下数据结构:
list: [
  {
    title: '热门',
    items: [
      {
        id: '002J4UUk29y8BY',
        name: '薛之谦',
        avatar: 'https://y.gtimg.cn/music/photo_new/T001R300x300M000002J4UUk29y8BY.jpg?max_age=2592000'
      },
      {
        id: '0025NhlN2yWrP4',
        name: '周杰伦',
        avatar: 'https://y.gtimg.cn/music/photo_new/T001R300x300M0000025NhlN2yWrP4.jpg?max_age=2592000'
      },
      ...
    ]
  },
  {
    title: 'A',
    items: [
      {
        id: '0020PeOh4ZaCw1',
        name: 'Alan Walker (艾伦·沃克)',
        avatar: 'https://y.gtimg.cn/music/photo_new/T001R300x300M0000020PeOh4ZaCw1.jpg?max_age=2592000'
      },
      ...
    ]
  },
  ...
]
如何得到这种结构的数据?代码如下:
import Singer from 'common/js/singer'
const HOT_SINGER_LEN = 10
const HOT_NAME = '热门'

...

_normalizeSinger(list) {
  let map = {
    hot: {
      title: HOT_NAME,
      items: []
    }
  }
  list.forEach((item, index) => {
    // 只取前十名歌手作为热门
    if (index < HOT_SINGER_LEN) {
      // Singer类通过歌手id可以生成avatar链接
      map.hot.items.push(new Singer({
        name: item.Fsinger_name,
        id: item.Fsinger_mid
      }))
    }
    const key = item.Findex
    if (!map[key]) {
      map[key] = {
        title: key,
        items: []
      }
    }
    map[key].items.push(new Singer({
      name: item.Fsinger_name,
      id: item.Fsinger_mid
    }))
  })
  // 为了得到有序列表,我们需要处理 map
  let ret = []
  let hot = []
  for (let key in map) {
    let val = map[key]
    if (val.title.match(/[a-zA-Z]/)) {
      ret.push(val)
    } else if (val.title === HOT_NAME) {
      hot.push(val)
    }
  }
  ret.sort((a, b) => {
    // 按照“A-Z”的字母顺序排列
    return a.title.charCodeAt(0) - b.title.charCodeAt(0)
  })
  return hot.concat(ret)
}Singer是抽象出来的类,作用是统一生成_normalizeSinger()方法中被push进items数组的单个歌手信息(id、name、avatar ),详细实现如下:
// common/js/singer

export default class Singer {
  constructor({id, name}) {
    this.id = id
    this.name = name
    this.avatar = `https://y.gtimg.cn/music/photo_new/T001R300x300M000${id}.jpg?max_age=2592000`
  }
}
二、代码实现
src/base/listview/listview.vue:
<template>
  <scroll class="list-view" :data="data" ref="listview" :probe-type="3" listen-scroll @scroll="scroll">
    <ul>
      <li v-for="group in data" :key="group.title" class="list-group" ref="listGroup">
        <h2 class="list-group-title">{{group.title}}</h2>
        <ul>
          <li v-for="item in group.list" :key="item.id" class="list-group-item" @click="selectItem(item)">
            <img class="avatar" v-lazy="item.avatar" alt="">
            <span class="name">{{item.name}}</span>
          </li>
        </ul>
      </li>
    </ul>
    <div class="list-shortcut" @touchstart="onShortcutTouchStart" @touchmove.stop.prevent="onShortcutTouchMove">
      <ul>
        <li v-for="(item, i) in shortcutList" :key="item" class="item" :class="{current : currIndex === i}" :data-index="i">{{item}}</li>
      </ul>
    </div>
    <div class="list-fixed" v-show="fixedTitle" ref="fixedTitle">
      <h2 class="fixed-title">{{fixedTitle}}</h2>
    </div>
    <div v-show="!data.length" class="loading-container">
      <loading></loading>
    </div>
  </scroll>
</template>

<script type="text/ecmascript-6">
// dom.js传送门:https://blog.wy310.cn/2020/01/16/vue-operate-dom/
import {getData} from 'common/js/dom'
// 每一个字母的高度(加padding)
const ANCHOR_HEIGHT = 16
// 区间标题的高度
const TITLE_HEIGHT = 30

export default {
  name: 'listview',
  props: {
    data: {
      type: Array,
      default () {
        return []
      }
    }
  },
  data () {
    return {
      scrollY: -1, // 滑动列表时,需要实时获取纵坐标,判断该值落在什么区间,从而高亮右侧导航栏中相应的字母
      currIndex: 0, // 导航栏当前高亮的索引
      diff: 0 // 头部标签的偏移量(标签顶部到容器顶部的距离),为了实现头部标签"顶""拉"的动画效果
    }
  },
  computed: {
    // 右侧导航栏的数据
    shortcutList () {
      return this.data.map(group => {
        return group.title.substr(0, 1)
      })
    },
    fixedTitle () {
      // 已至顶部仍然继续下拉,则不显示头部标签
      if (this.scrollY > 0) {
        return ''
      }
      return this.data[this.currIndex] ? this.data[this.currIndex].title : ''
    }
  },
  created () {
    // 定义一个触摸对象,目的是点击、滑动右侧导航栏实现左侧列表的联动
    this.touch = {}
    this.listHeight = [] // 记录左侧列表每个区间相对于顶部的距离,有了这个“距离列表”,才能判断当前滑动到哪个区间
  },
  methods: {
    // 监听导航栏的触摸开始事件
    onShortcutTouchStart (e) {
      let anchorIndex = getData(e.target, 'index')
      let touchStart = e.touches[0]
      this.touch.y1 = touchStart.pageY
      this.touch.anchorIndex = parseInt(anchorIndex)
      this.currIndex = parseInt(anchorIndex)
      this._scrollTo(anchorIndex)
    },
    // 监听导航栏的触摸移动事件
    onShortcutTouchMove (e) {
      let touchMove = e.touches[0]
      this.touch.y2 = touchMove.pageY
      let delta = (this.touch.y2 - this.touch.y1) / ANCHOR_HEIGHT | 0
      let anchorIndex = this.touch.anchorIndex + delta
      if (anchorIndex < 0) {
        anchorIndex = 0
      }
      if (anchorIndex > this.data.length - 1) {
        anchorIndex = this.data.length - 1
      }
      this.currIndex = anchorIndex
      this._scrollTo(anchorIndex)
    },
    // 监听左侧列表的滚动事件,将实时的滚动纵坐标(pos.y)赋给scrollY
    scroll (pos) {
      this.scrollY = pos.y
    },
    // 点击、滑动右侧导航栏,调用better-scroll的scrollToElement()方法,使左侧列表滚动到指定区间
    _scrollTo (index) {
      // 超出范围,不滚动
      if (index < 0 || index > this.data.length - 1 || isNaN(index)) {
        return false
      }
      this.$refs.listview.scrollToElement(this.$refs.listGroup[index], 0) // 第二个参数表示是否添加缓动函数
    },
    // 计算左边每个区间相对于顶部的距离
    _calculateheight () {
      this.listHeight = []
      const list = this.$refs.listGroup
      let height = 0
      // 第一个区间相对于顶部的偏移量是0
      this.listHeight.push(height)
      for (let i = 0; i < list.length; i++) {
        height += list[i].clientHeight
        this.listHeight.push(height)
      }
    },
    // 点击列表,派发事件给调用者
    selectItem (obj) {
      this.$emit('select', obj)
    }
  },
  watch: {
    data () {
      // 数据变化->DOM变化,有一个17毫秒左右的延时
      this.timer = setTimeout(() => {
        this._calculateheight()
      }, 20)
    },
    // 监听左侧滑动的纵坐标,分三种情况讨论,获取当前索引currIndex和头部标签的偏移量diff
    scrollY (newY) {
      const listHeight = this.listHeight
      // 页面已是最上面,仍然下拉,
      if (newY > 0) {
        this.currIndex = 0
        return false
      }
      // 在中间部分滑动(newY是负数)
      for (let i = 0; i < listHeight.length - 1; i++) {
        let height1 = listHeight[i]
        let height2 = listHeight[i + 1]
        if (-newY >= height1 && -newY < height2) {
          // 节流,防止重复赋值
          if (i !== this.currIndex) {
            this.currIndex = i
          }
          this.diff = height2 + newY
          return false
        }
      }
      // 页面已是最下面,仍然上拉,newY > listHeight最后一个值
      this.currIndex = this.data.length - 1 // 或listHeight.length - 2
    },
    diff (newDiff) {
      let fixedTop = (newDiff > 0 && newDiff < TITLE_HEIGHT) ? newDiff - TITLE_HEIGHT : 0
      // 节流,只在"顶"的时候赋新值
      if (this.fixedTop === fixedTop) {
        return false
      }
      this.fixedTop = fixedTop
      // 使用translate3d的目的是开启GPU加速,能使动画更流畅
      this.$refs.fixedTitle.style.transform = `translate3d(0, ${fixedTop}px, 0)`
    }
  },
  destoryed () {
    clearTimeout(this.timer)
  }
}
</script>

<style lang="stylus" rel="stylesheet/stylus">
// variable.styl传送门:https://blog.wy310.cn/2020/01/11/vue-build-basic-style-structure/
@import "~common/stylus/variable"

.list-view
  position: relative
  width: 100%
  height: 100%
  overflow: hidden
  background: $color-background
  .list-group
    padding-bottom: 30px
    .list-group-title
      height: 30px
      line-height: 30px
      padding-left: 20px
      font-size: $font-size-small
      color: $color-text-l
      background: $color-highlight-background
    .list-group-item
      display: flex
      align-items: center
      padding: 20px 0 0 30px
      .avatar
        width: 50px
        height: 50px
        border-radius: 50%
      .name
        margin-left: 20px
        color: $color-text-l
        font-size: $font-size-medium
  .list-shortcut
    position: absolute
    z-index: 30
    right: 2px
    top: 50%
    transform: translateY(-50%)
    text-align: center
    font-family: Helvetica
    .item
      display: flex
      align-items: center
      justify-content: center
      width: 16px
      height: 16px
      line-height: 1
      color: $color-text-l
      font-size: $font-size-small
      &.current
        color: $color-background
        &:before
          position: absolute;
          display: block
          content: ''
          width: 16px
          height: 16px
          border-radius: 50%
          background-color $color-theme
          z-index: -1;
.list-fixed
    position: absolute
    top: 0
    left: 0
    width: 100%
    .fixed-title
      height: 30px
      line-height: 30px
      padding-left: 20px
      font-size: $font-size-small
      color: $color-text-l
      background: $color-highlight-background
  .loading-container
    position: absolute
    width: 100%
    top: 50%
    transform: translateY(-50%)
</style>
三、调用
<listview :data="singerList"></listview>0
0 条评论